Building gateway to access legacy IPv4 Internet from IPv6 only work laptop
Want to be among leading engineers testing IPv6 protocol by switching off IPv4 completely for your work laptop?
But scared by inability to use IPv4 only services such as GitHub?
I can recommend solution for it.
We can use some protocol trickery to transparently "upgrade" all IPv4 connections to IPv6 even if particular service does not offer IPv6 support at all. We will do so using very small box with constrained amount of compute resources in our network.
I like this approach as it allows to remove all legacy parts from machine and simplifies all the things by keeping environment IPv6 only.
We will use software which will implement protocols NAT64 and DNS64 to make such transition possible.

How it works? Let's look on GitHub which has no IPv6 support at all:
dig -t aaaa github.com

; <<>> DiG 9.11.3-1ubuntu1.18-Ubuntu <<>> -t aaaa github.com
;; global options: +cmd
;; Got answer:
;; ->>HEADER<<- opcode: QUERY, status: NOERROR, id: 41594
;; flags: qr rd ra; QUERY: 1, ANSWER: 0, AUTHORITY: 0, ADDITIONAL: 1

;; OPT PSEUDOSECTION:
; EDNS: version: 0, flags:; udp: 65494
;; QUESTION SECTION:
;github.com.			IN	AAAA

;; Query time: 6 msec
;; SERVER: 127.0.0.53#53(127.0.0.53)
;; WHEN: Wed Oct 04 17:51:44 BST 2023
;; MSG SIZE  rcvd: 39
What we have is only IPv4 address:
dig -t a github.com

; <<>> DiG 9.11.3-1ubuntu1.18-Ubuntu <<>> -t a github.com
;; global options: +cmd
;; Got answer:
;; ->>HEADER<<- opcode: QUERY, status: NOERROR, id: 39803
;; flags: qr rd ra; QUERY: 1, ANSWER: 1, AUTHORITY: 0, ADDITIONAL: 1

;; OPT PSEUDOSECTION:
; EDNS: version: 0, flags:; udp: 65494
;; QUESTION SECTION:
;github.com.			IN	A

;; ANSWER SECTION:
github.com.		60	IN	A	140.82.121.3

;; Query time: 3 msec
;; SERVER: 127.0.0.53#53(127.0.0.53)
;; WHEN: Wed Oct 04 17:52:13 BST 2023
;; MSG SIZE  rcvd: 55
What we can do? We can use protocol called DNS64 for recursive DNS resolver deployed in our network or provided by public DNS resolver such as Google DNS It works by creating synthetic AAAA records for domains without AAAA / IPv6 records in place.
Let's ask about GitHub's IPv6 / AAAA record from DNS64 capable Google DNS:
dig -t aaaa github.com @2001:4860:4860::64

; <<>> DiG 9.18.12-0ubuntu0.22.04.3-Ubuntu <<>> -t aaaa github.com @2001:4860:4860::64
;; global options: +cmd
;; Got answer:
;; ->>HEADER<<- opcode: QUERY, status: NOERROR, id: 37258
;; flags: qr rd ra; QUERY: 1, ANSWER: 1, AUTHORITY: 0, ADDITIONAL: 1

;; OPT PSEUDOSECTION:
; EDNS: version: 0, flags:; udp: 512
;; QUESTION SECTION:
;github.com.			IN	AAAA

;; ANSWER SECTION:
github.com.		60	IN	AAAA	64:ff9b::8c52:7903

;; Query time: 12 msec
;; SERVER: 2001:4860:4860::64#53(2001:4860:4860::64) (UDP)
;; WHEN: Wed Oct 04 17:54:46 BST 2023
;; MSG SIZE  rcvd: 67
Oh, wow. We got IPv6 address. Got that year 2035 feeling? Me too
How it worked? Google DNS discovered that GitHub has no AAAA records and mapped IPv4 address from A record using special prefix 64:ff9b::/96 recommended by RFC.
IPv6 prefix is documented in RFC but how address part "8c52:7903" was generated? Very easy actually. We just encoded original IPv4 address in hexademical format:
perl -e 'printf("%x%x:%x%x", 140, 82, 121, 4)'
8c52:794
And the best part that we know original IPv4 address and we can use it. This special prefix is not announced in global and if we try connecting it it will not work:
curl -v http://[64:ff9b::8c52:7903]
*   Trying 64:ff9b::8c52:7903:80...
* TCP_NODELAY set
* connect to 64:ff9b::8c52:7903 port 80 failed: Network is unreachable
* Failed to connect to 64:ff9b::8c52:7903 port 80: Network is unreachable
* Closing connection 0
curl: (7) Failed to connect to 64:ff9b::8c52:7903 port 80: Network is unreachable
It means that we need to deploy it on our own side. In my case I deployed it in my home network. Would be great to see more ISP offering this translation service from their side as it will eliminate need to install additional machines and maintain them.
I'll explain required steps needed to deploy NAT64 box required to transform connection to such specially crafted IPv6 addresses to IPv4 connections from translation box.
For my tests I'll use Debian 12 on my SBC board as server and Ubuntu 22.04 as client. My guide was originally based on great article by Robin Meis.
First of all you will need to install your own Recursive DNS server. You may use cloud DNS offerings for NAT64 but you still need server for NAT translations and there are no reasons to leak your personal browsing to companies and countries as they may have very weak data protection policies.
I used Unbound for my setup.
To enable DNS64 you just need to make few configuration changes for module configuration:
module-config: "dns64 validator iterator"And then manually add prefix for DNS64:
# DNS64 prefix for NAT64:
dns64-prefix: 64:ff9b::/96
Then you need to install Tayga transalation daemon and configure it. To start installation please run this command:
sudo apt install -y taygaThen open configuration file:
sudo vim /etc/tayga.conf And then add following (you will need to replace xx by actual IP addresses of your NAT64 server):
tun-device nat64

# TAYGA's IPv4 address
ipv4-addr 192.168.1.xx

# TAYGA's IPv6 address
ipv6-addr XXXX

# The NAT64 prefix.
prefix 64:ff9b::/96

# Dynamic pool prefix, not clear what is it
dynamic-pool 192.168.255.0/24

# Persistent data storage directory
data-dir /var/spool/tayga
Then apply configuration and enable auto-start:
sudo systemctl restart tayga
sudo systemctl enable tayga
This machine will work as router and we will need to enable forwarding for Linux kernel:
echo -e "net.ipv4.ip_forward=1\nnet.ipv6.conf.all.forwarding=1" | sudo tee /etc/sysctl.d/98-enable-forwarding.confAnd then apply these changes:
sudo sysctl --system Then create iptables rules for NAT:
sudo iptables -t nat -A POSTROUTING -o nat64 -j MASQUERADE
sudo iptables -t nat -A POSTROUTING -s 192.168.255.0/24 -j MASQUERADE
I can recommend installing package iptables-persistent which allows logic to restore iptables configuration on machine boot. It will ask you to save your current configuration into file and you will need to confirm it:
sudo apt install -y iptables-persistentAfter making all these changes I recommend doing full reboot for NAT server to confirm that all daemons started on boot.
After that you need to change configuration for client machine in network manager (yes, using UI) that way:
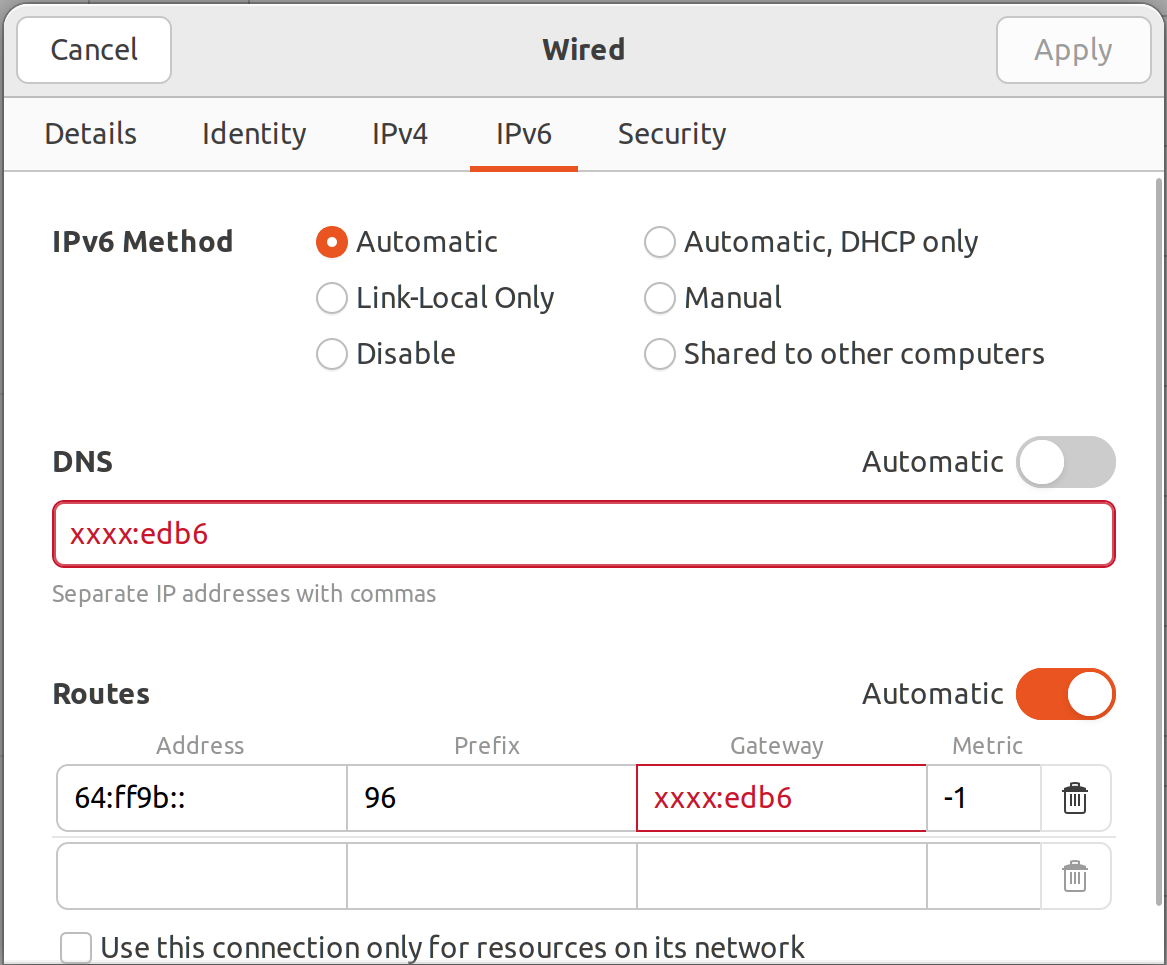
With this change we switched recursive DNS server to our own and added route to machine with NAT64 box as gateway for DNS64 prefix. This route trickery can be simplified and I'll document it in future articles.
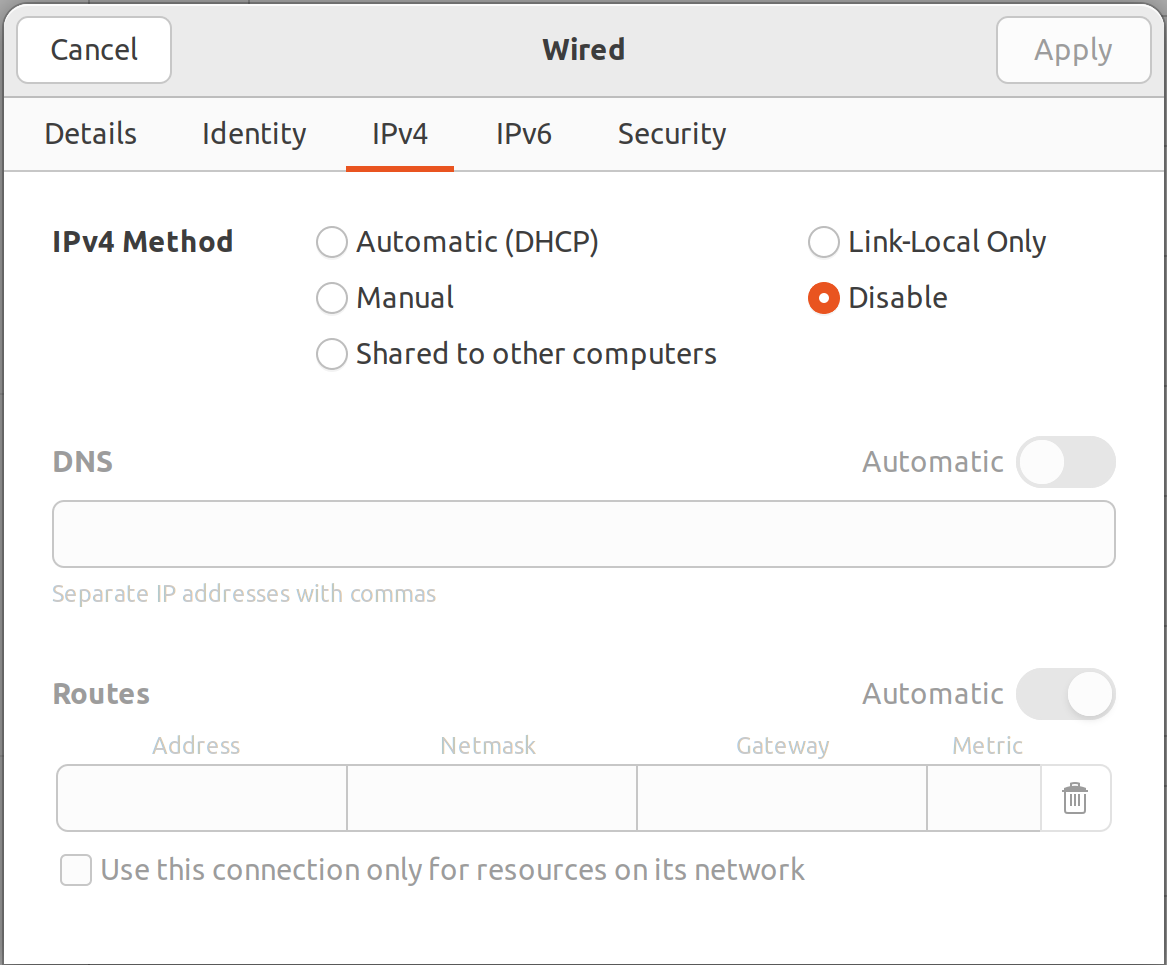
After that you can finally try disabling IPv4 this way:
Then you can check configuration by opening some IPv4 only site like GitHub in browser and confirming that it works just fine:
I hope you got this feeling of fresh air by disabling IPv4 stack completely.
You may face issues as some apps do not use DNS and use hardcoded IPv4 literals. Fortunately, it's pretty rare and almost all apps on my machine work just fine.
Want to make it hardcore? Try to get rid of 127.0.0.1 for localhost connections.